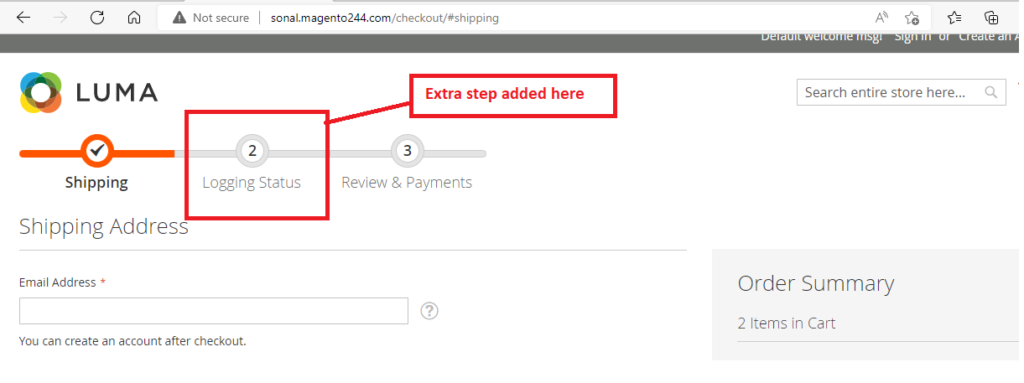
How to add new checkout step in Magento2
Originally, the default Magento 2 checkout process includes two steps:
- Shipping Step
- Review and Payment Step
In various project, there is requirement of adding new step. You can add a custom step; note that it should be implemented as a UI component. The customizations should be happening in a separate module to ensure the page’s compatibility, upgradability, and maintenance.
The steps to add a new checkout step should be the following:
-
- Add your step to the Checkout page layout
- Display field in this new step
Step 1: Create the view part of the checkout step component
To create the view part of the new checkout step:
Let’s create Folders Thecoachsmb/Checkoutstep in app/code, then register and declare the module.
Create registration.php file in app/code/Thecoachsmb/Checkoutstep/ directory.
Create registration.php
<?php
\Magento\Framework\Component\ComponentRegistrar::register(
        \Magento\Framework\Component\ComponentRegistrar::MODULE,
        'Thecoachsmb_Checkoutstep',
        __DIR__);
Created the registration.php file to register the module.
Create module.xml
Create the module.xml file in app/code/Thecoachsmb/Checkoutstep/etc to declare the module.
<?xml version="1.0"?>
<config xmlns:xsi="http://www.w3.org/2001/XMLSchema-instance" xsi:noNamespaceSchemaLocation="../../../../../lib/internal/Magento/Framework/Module/etc/module.xsd">
    <module name="Thecoachsmb_Checkoutstep" setup_version="1.0.0" >
        <sequence>
            <module name="Magento_Checkout"/>
        </sequence>
    </module>
</config>
Add your step to the Checkout page layout
We need to extend the checkout page’s layout to be able to display the new step
Add this file in our module: Thecoachsmb/Checkoutstep/view/frontend/layout/checkout_index_index.xml
The content as follow:
<?xml version="1.0"?>
<page xmlns:xsi="http://www.w3.org/2001/XMLSchema-instance" layout="1column" xsi:noNamespaceSchemaLocation="urn:magento:framework:View/Layout/etc/page_configuration.xsd">
    <body>
        <referenceBlock name="checkout.root">
                <arguments>
                    <argument name="jsLayout" xsi:type="array">
                        <item name="components" xsi:type="array">
                            <item name="checkout" xsi:type="array">
                                <item name="children" xsi:type="array">
                                    <item name="steps" xsi:type="array">
                                        <item name="children" xsi:type="array">
                                            <!-- The new step you add -->
                                            <item name="customer-info-step" xsi:type="array">
                                                <item name="component" xsi:type="string">Thecoachsmb_Checkoutstep/js/view/customer-info-step</item>
                                                    <!--To display step content before shipping step "sortOrder" value should be < 1-->
                                                    <!--To display step content between shipping step and payment step  1 < "sortOrder" < 2 -->
                                                    <!--To display step content after payment step "sortOrder" > 2 -->
                                                <item name="sortOrder" xsi:type="string">2</item>
                                                <item name="children" xsi:type="array">
                                                    <!--add here child component declaration for your step-->
                                                </item>
                                            </item>
                                        </item>
                                    </item>
                                </item>
                            </item>
                        </item>
                    </argument>
                </arguments>
        </referenceBlock>
    </body>
</page>
Step 2: Display field in this new step
Add the JavaScript file implementing the new step
A new checkout step must be implemented as UI component. That is, its JavaScript implementation must be a JavaScript module. The file must be stored under the app/code/Thecoachsmb/Checkoutstep/view/frontend/web/js/view directory.
Create customer-info-step.js file
define(
    [
        'ko',
        'uiComponent',
        'underscore',
        'Magento_Checkout/js/model/step-navigator',
        'Magento_Customer/js/model/customer'
    ],
    function (
        ko,
        Component,
        _,
        stepNavigator,
        customer
    ) {
        'use strict';
        /**
         * customer-info - is the name of the component's .html template
         */
        return Component.extend({
            defaults: {
                template: 'Thecoachsmb_Checkoutstep/customer-info'
            },

            //add here your logic to display step,
            isVisible: ko.observable(true),
            isLogedIn: customer.isLoggedIn(),
            //step code will be used as step content id in the component template
            stepCode: 'customerInfo',
            //step title value
            stepTitle: 'customer info step',

            /**
             *
             * @returns {*}
             */
            initialize: function () {
                this._super();
                // register your step
                stepNavigator.registerStep(
                    this.stepCode,
                    //step alias
                    null,
                    this.stepTitle,
                    //observable property with logic when display step or hide step
                    this.isVisible,

                    _.bind(this.navigate, this),

                    /**
                     * sort order value
                     * 'sort order value' < 10: step displays before shipping step;
                     * 10 < 'sort order value' < 20 : step displays between shipping and payment step
                     * 'sort order value' > 20 : step displays after payment step
                     */
                    15
                );

                return this;
            },

            /**
             * The navigate() method is responsible for navigation between checkout step
             * during checkout. You can add custom logic, for example some conditions
             * for switching to your custom step
             */
            navigate: function () {

            },

            /**
             * @returns void
             */
            navigateToNextStep: function () {
                stepNavigator.next();
            }
        });
    }
);
Basically, we need step_code, step_title, order and the condition that allows to display this step.
Add the content in template file
In the module directory, add the customer-info.htmlapp/code/Thecoachsmb/Checkoutstep/view/frontend/web/template directory.
Create customer-info.html file as below:
<!--Use 'stepCode' as id attribute-->
<li data-bind="fadeVisible: isVisible, attr: { id: stepCode }">
    <div class="step-title" data-bind="i18n: stepTitle" data-role="title"></div>
    <div id="checkout-step-title"
         class="step-content"
         data-role="content">
        <p>This is additional step.</p>
        <p>The customer is <span data-bind="if: !isLogedIn">not</span> Logged-in</p>
        <div class="newfield"><input type="text" name="newfield"/></div>
        <form data-bind="submit: navigateToNextStep" novalidate="novalidate">
            <div class="actions-toolbar">
                <div class="primary">
                    <button data-role="opc-continue" type="submit" class="button action continue primary">
                        <span><!-- ko i18n: 'Next'--><!-- /ko --></span>
                    </button>
                </div>
            </div>
        </form>
    </div>
</li>
That’s the steps to add a new step to checkout page. Clean cache and refresh your browser


